
Part I: The Prologue – Android rooting
Background
In the game, Watchdogs, the hacker ‘Aiden Pierce’ uses his cell phone alone to hack into organizations or perform MITMs (Man in the Middle Attacks). This got me thinking, what if I could build my own mobile pen-testing device and started my research on the same. After 2 years of intermittent toying around and bricking 2 Sony Xperia devices, I could successfully build a mobile low-budget but high-end hacking platform with the help of Kali and tons of other APK-based tools and custom scripts. This blog series outlines all the necessary hardware, software, and step-by-step instructions to building your personal mobile pen-testing device.
The end-game
The end-game was to have the following in place:
- Should run on the latest Android build
- OS Security even after rooting the devices (Iptable based firewalls and service monitoring)
- No G-Apps (Google apps tend to make the system lag unnecessarily due to continuous backend services)
- Open Source App Store without registration (Aptoide, F-droid and similar)
- Linux (Ubuntu/Kali) chroot environment for armhf/armel devices
- Kernel-level support for external USB network adapters, SDRs, NFC reader/writers, HID attacks and live booting a system from my device
- Multi-ROM Support (for testing new apps and OS)
- Full recovery backup (I mean literally full system encrypted backup)
- Budget limited to 500 USD or 35000 INR max
- Support for war-driving (Wifi-GPS and Ubertooth)
- Support for Y-Cable (for NHR alpha card and charger)
- ROM with Xposed Framework Support
I have named the device as Anarchy (there is a reasonable explanation in the next post!). And the best part was all this cost just under $300 to build a device (this cost includes all the above hardware except NFC card writer, which it alone costs around $100).
Before we get started, let’s go through a few concepts and terminologies that I would be using throughout the series. These are critical to understand before we proceed, else you could end up with a dead phone which will never boot!
- Bootloader
A bootloader is just a small piece of code that gets executed whenever you start your phone. It is something that gets executed even before you see the actual bootloader animation. Now, most people confuse bootloader with BIOS, but they both are different in nature. BIOS resides in the internal flash memory of the motherboard, which starts as soon as the computer starts, run a series of tests, and then transfers the info about the hardware to the bootloader, whereas the bootloader differs from OS to OS. And that is the reason we can perform multi-boot or dual boot in certain recoveries of the Android System. One can understand bootloader to be as good as the Red Hat’s LILO or LOADLIN and more preferably the GRUB in Ubuntu, Crux or Debian. By default, in Android, the bootloaders are always locked and they need to be unlocked to root, install custom recoveries, ROMS, kernels, modems, firmwares, and other patches to the system files.
Nexus 5 fastboot mode for unlocking bootloader
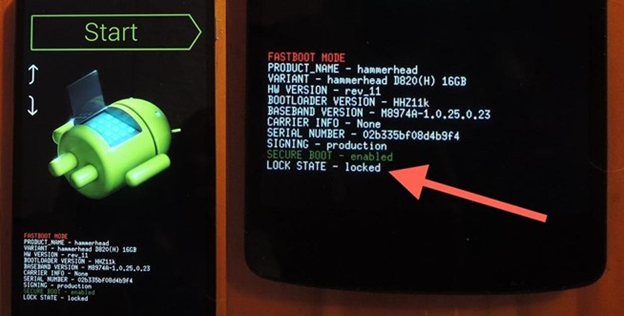
Most devices can be unlocked easily with fastboot commands, whereas some manufacturers like the HTC, Motorola, Sony, Xiaomi tend to use a key, officially known as oem identifier token to lock the bootloaders to maintain the security of the user’s data in case the device gets lost. These keys can be obtained from the company’s site by registering onto their portal. Whenever a bootloader is unlocked, it factory resets the entire phone and all the data will be wiped (sdcard data will stay as it is, only system partition, apps and system data will be lost). However, some infamous devices, tend to crash the system whenever someone tries to unlock the bootloader and the device will straight away brick itself by going into a boot-loop, and you will be left with no other choice than to install a new ROM with a new bootloader. This was essentially made for the security of the phone and is not a bug or error.

- Rooting
Rooting is the process of gaining administrative access of the device via available exploits. There is always the possibility of data leakage to the third parties if the rooting process is not done properly. By default, all cellphones are boot-locked and unrooted. Remember, rooting does not brick your device! Rooting just escalates the privilege from a normal user to an administrator. Unlocking bootloader can brick and wipe your device but rooting does not. Having root access enables you to modify system partitions, swap internal and external sdcard to increase device storage, basically allowing a person to have full access to the system. The only reason of concern is that, since you have root access to the device, so does any app that you install on your phone after rooting it; which means if somehow you unknowingly install any malicious app, then that app can exfiltrate the data from your phone which it wouldn’t be able to incase the phone was not rooted. This is the reason why people use root managers like the infamous SuperSU app from Chainfire or Superuser from ClockWorkMod to keep all the permissions in check.
- Recovery Partition
A Recovery partition in Android is a separate dedicated partition altogether kept apart from the system partition itself. One cannot access the recovery partition when the phone is booted. One basically needs to boot the phone itself into recovery mode and then can modify the contents of the file system. By default, manufacturers allow only signed updates from their own company to be flashed via recoveries. So, if we want to flash (flashing means installing) a new ROM, kernel, recovery, modem, firmware or even if we want to dual boot and take system backups, we would require a custom recovery. There are 2 famous recoveries:
- Clockwork Recovery Mod (CWM)
- Team Win Recovery Project (TWRP)
I personally prefer TWRP for its exclusive support and extensive set of features like providing terminal console access, sideloading image files, injecting modified code into an exist boot.img file and many more. Boot.img is the file which manages the boot configuration of the Cell phone device. TWRP is what I would be using throughout the series for all types of flashing ROMS, injecting images and taking full system and partition backups.
TWRP main screen screenshot
- ROM
A ROM (Read-Only Memory) is the where actual OS of your system for e.g. Marshmallow, KitKat, Lollipop resides. But most people argue as to how can ROMs be read only when we can write data to the sdcard, install applications in the internal memory and so on. The reason being whenever you purchase a new phone, we never get rooted devices. Manufacturers always tend to provide us bootloader locked and unrooted devices which means that the main system partition is read-only and it can never be edited whereas other installable softwares will reside in the data partition of the internal memory which can be edited, but only by the system. One cannot view the stored databases of the applications without having root access to the phone. Only after rooting the phone, one can make the ROM R/W (readable and writable).
- Modem firmwares
A modem is just a radio transceiver kind of hardware which sends and receives data over any network. Modem is the one which is responsible for communicating over GSM, Wi-Fi and Bluetooth. The first time I rooted and changed the ROM in my cell phone, I noticed how the range of my SIM card started fluctuating. A lot of times my 4G internet stopped working because the support for 4G was not included in the modem firmware of the ROM. By default, the developers of ROMs include the modem firmware only of their specific region. So, it means the frequencies of the GSM Band could fluctuate depending upon the country where you live. Also, the modem firmwares differ from device to device. The developers in https://www.xda-developers.com/ are pretty awesome for keeping a stack of modems from all across the globe and almost all types of devices. Make sure to flash the proper firmware modem for your device once flashing of ROM is done, else you could end up with a device having no network connectivity at all and a never-ending error of ‘no sim card inserted’.
So, this was all about introduction to android rooting. The reason I dedicated an entire blogpost for rooting and flashing (before we move to building the device OS) is because having a proper pentesting device is as good as creating you own operating system. One needs to understand the kernel, the OS loaded, the drivers for external hardware, the support for external devices integrated into kernel, and obviously not to forget the default set of drivers of android for accelerometer, GPS, barometer, modems, etc. Thus, without proper knowledge, one can easily hard-brick their device which could just never boot at all. I will however cover every measure on how to properly configure everything in the next few blogs, but till then read as much as you can on android firmwares and the ARM architecture (categorically ARMHF and ARMEL).
Chetan Nayak is a security researcher in Network Intelligence. He has a keen interest in Malware development, hacking networks, RF devices and threat hunting.
i have huawei phone
but this way doesn’t working..
any another solution?
You will need to download the official kernel and modify the same or use the new lineage OS kernel to modify it