
The Scope
Recently, we conducted a red team assessment for a large enterprise client where the scenarios allowed were to either use the hardened laptop of the client or to try and connect our own laptop to the network (though they did have a Network Access Control system in place). This blog posts lists out our attempts to overcome the security controls, escalate our privileges, and move through the network, while at the same time ensuring that the SOC does not pick up our activities. For the purpose of this blog, I will be using a virtual name for the bank which is SPB-Groups.
Preliminary Escalation: Day 1
We were given a system with Windows 7 x64 and a user named SPB-RANDOM-USER. The user was a non-admin and had extremely limited privileges on the network. PowerShell was blocked on all endpoints. They had Symantec AV and Windows Security Essentials (MSE) on the given system fully updated till date. Alternatively, Cisco NAC agents were also deployed to prevent unauthorized access by external laptops to the client network. All USB ports were disabled, Wi-Fi was enabled, but without any Internet access.
So, the primary thing we started with was to find if there were any misconfiguration in the given system through which we could escalate our privileges to local admin. We couldn’t find any since most of the things were blocked by the group policy itself. We decided to split the whole task into two parts. My colleague started to analyze different ways to bypass the security mechanisms on the laptop while I started looking for ways to get access to the network via my personal laptop.
Upon searching for patches using the below command:
wmic qfe list full /format:htable > Updates.html
we found that the client machine was vulnerable to Meltdown (CVE-2017-5715) and Windows COM Privilege Escalation (CVE-2017-0213). I quickly started searching for a POC for either of the exploits online. It was hard to get a hold of Meltdown since it was newly released and there was only a POC which stated whether the system was vulnerable or not. Using the POC to write a custom Meltdown exploit was the last thing we decided that we would do when everything else fails; since it would be pretty time consuming. However, I found a working binary for CVE-2017-0213 which I have uploaded here. The original source code of the exploit can be found here.. Now we had an exploit which could work, but there was a risk of AV detecting it and alerting it to the SOC which we obviously wanted to avoid. Before testing the exploits, we decided to disconnect the machine from their network and connect to our personal hotspot to upload the binaries of the exploit via HTTP. So, I modified the exploit to avoid AV detection but MSE was pretty strong to detect it no matter what how much we modified it.
Now we were stuck with a laptop which we weren’t able to exploit and couldn’t connect it back to the network since it would send an alert of the AV detection. So, while my colleague was busy trying to find a way to bypass the AV, I tried to see if I could bypass the NAC security and get access to the network on my personal laptop. We had a Cisco IP Phone in the room where we were sitting which I then started messing around with, to see if I could get access to the LAN via that. I found that Authentication was enabled without any password. So, I disabled the authentication, changed the mode to Non-Secure and found the MAC address of the IP Phone. I then spoofed the MAC address on my personal Windows machine as below.
| Device Manager-> Network Adapters -> Ethernet Adapter -> Advanced -> Network Address -> Value |
Now before connecting my machine to the network I decided to change my hostname to something that matches the hostname schema of the company so that I can hide my laptop in plain sight in the proxy/firewall logs, something like SPB-ComputerName. I then connected the LAN cable and boom! I got an IP address and I was connected to their network.
Next step was to find out where were the AD/DC, DNS Servers located. More important than finding the Forest DC was to find the key business Servers which contained the main business applications. Getting access to those meant getting access to the real crown jewels.
Rogue Scanning: Day 2
Start of day 2 was disappointing. We returned to the client location only to find out that the primary system which was given to us had already connected back to the WiFi network of the office. This meant that the AV had already pushed up all the alerts that were raised during testing out the exploits a day back. Another problem was when we opened up the laptop, we saw that new patches had been installed and the system was rebooted automatically. Meltdown was patched now.
We thought of just keeping the system aside and targeting the network from my personal computer. Instead of using Nmap or some other tool to scan, we decided to directly check the ARP cache and the netstat of the local system. We found a system with the naming convention SPB-DC08 and SPB-RDS30. Looking at the naming convention, we were able to identify that the first one was a DC and second was a Remote Desktop Server. This server RDS30 turned out to be the jump server which is used to connect to various server segments. We then used a PowerShell module named Get-ADComputer on our personal laptop to query the AD to get a list of computers from the AD itself. Doing this it will make sure only legitimate systems are queried and it would keep us away from scanning any decoys (if it were present) or atleast that was the hope.
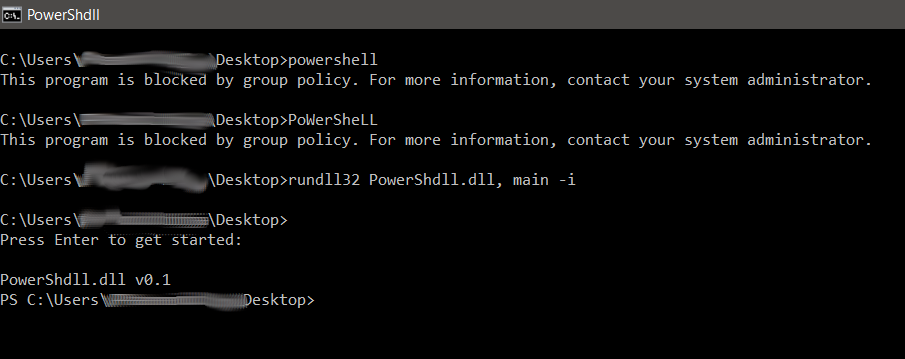
While the query was running, we thought of trying to connect via RDP to the RDS30 server with the default user we were given. We successfully connected to the machine. It was a Windows server 2008 with no AV installed. PowerShell was still blocked however. We had to get PowerShell up and running on this machine there if we wanted to proceed further. Most of the times the Windows AppLocker and the Group Policies block the PowerShell via the file hash. This means if I could use a custom binary to call the PowerShell DLL via winAPI, it would surely work. We thus used the PowerShDLL DLL to call the PowerShell DLL via CMD instead of directly calling the exe of the PowerShell via rundll32. With this we were easily able to bypass the Windows Group Policy App locker/Security policies and get a PowerShell Console.
Once, we had PowerShell access in the domain itself, we started to enumerate User SPNs so as to perform Kerberoasting. We used the PowerShell script GetUserSPN.ps1 script to get a list of all user SPNs.
Alternatively we thought that since patches are deployed on all systems via SCCM, if our previous system was vulnerable to the CVE-2017-0213, even this should be. And since there is no AV installed, we should be able to escalate our privilege. We moved the CVE binary from my system via RDP to the remote target, executed it and boom!
I added a new user as a local admin for persistence which I can connect via Psexec.exe in case my existing user gets blocked since it had already triggered the AV previously. Persistence is a pretty important thing when you perform red team assessments.
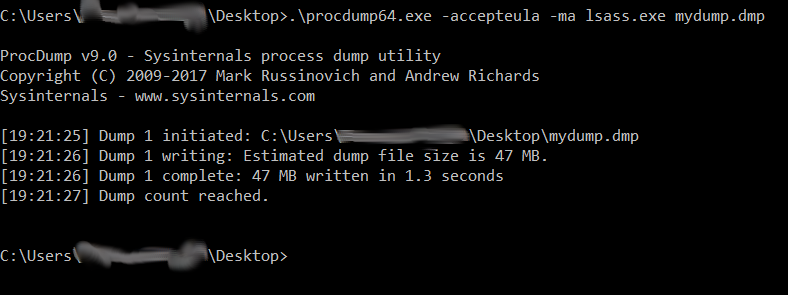
Now the next best step was to dump the credentials of the system. I used Procdump.exe as below. The aim was to use as low a number of malicious binaries as possible. Since Procdump is officially signed by Microsoft, there was a less chance of it getting sighted as malicious.
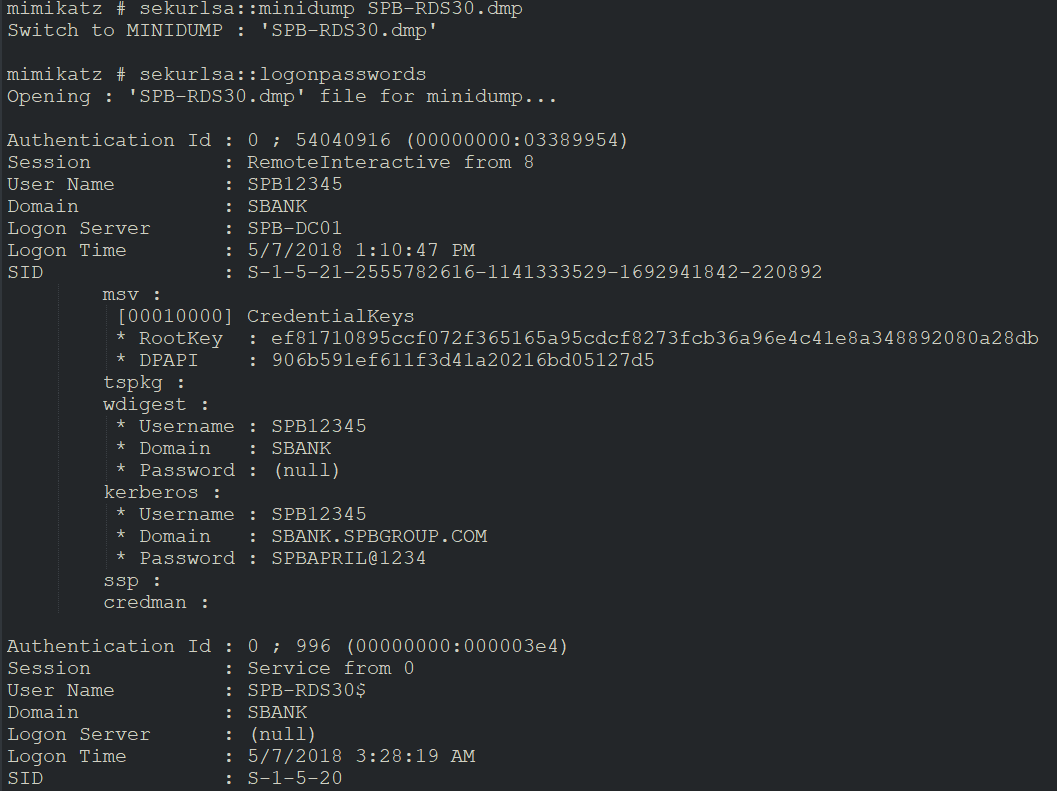
Once a dump was created, we copied it back to our system and used Mimikatz to dump the creds locally.
P.S.: The usernames, domain names, rootkeys, passwords, Authentication IDs which you can see below all have been modified to virtual ones. These are not real and only made to look real so as to make it relatable to the blog.
Now we had access to around 8-9 credentials, most of them were normal users however and still we were far away from getting Domain Admins or Application Admins. But this was a good start. Now came the time when we decided to start moving laterally. We started enumerating other systems by guessing and querying the DC name we gathered previously. So, if one system name is RDS30, then there must be others numerically like rds01, rds02, rds03 and so on. So, I wrote a simple script to perform nslookup on the DC in a loop on all these machines to see which machines existed so that I can use the dumped credentials to move laterally throughout the organization.
Also, we found a lot of users logged in with the domain/computer SPB-ERP, SPB-IT-HR, SPB-CC-DBADMIN other than the 8-9 compromised users above. This is when we realized that these are not real users. These were the Decoy users and if we would’ve used it, it would straight away raise an alert. So, we decided to use only users which were in the current domain, which looked legit by the naming convention or had logged in 2-3 days old only and by looking at the last login in Mimikatz dump.
The Lateral Movement: Day 3
So, one thing we decided was that we won’t use the same creds to login to different machines. So, we started to login with different creds every time we RDP’d to other systems. For eg:- If we had users like SPB-user1, SPB-user2, SPB-user3 and machines like SPB-system1, SPB-system2, SPB-system3; we were moving like this:
- Login to SPB-system1 with SPB-user1 via RDP
- Login to SPB-system2 from SPB-system1 via SPB-user2 via RDP
- Login to SPB-system3 from SPB-system2 from SPB-system1 via SPB-user3 via RDP and so on
We were basically 10 systems deep, had slow systems and lagging network connectivity but it kept everything quiet and outside the radar. Every system we logged in, we were taking a look at C:\Users to see if any new user had logged into the system recently (Change in date and time of the folder with username). We were only exploiting the system to dump creds, if any good users were there like DC-Admin, Support-Admin or SAP Admin. In this manner we reached around 60+ RDS systems gathering almost 90-100+ users logged in to the system.
We finally found an RDS user and this user had access to most of the RDS System with a bit higher privileges than the normal users that we were using. We also found an excel sheet in one of the RDS Desktop’s C:\ drive with the name “Users info”. When I opened it up it contained usernames and passwords of all local admins of the RDS Systems. This was like hitting the jackpot! So almost all RDS Servers were pawned at this point.
Now since we had access to almost all RDS servers, we had 2 options. Primary one being to wait for some admin to login to RDS, check every user folder and then again dump the password for that. Or we can simply run Bloodhound to find active session of users to different computers. Finally, being tired of doing this manually, we decided to use BloodHound. We downloaded the compiled dot net binary of BloodHound and ran it on one of the RDS server SPB-RDS46. And lo and behold. BloodHound gave us a list of active sessions of users and which system they are logged in into currently.
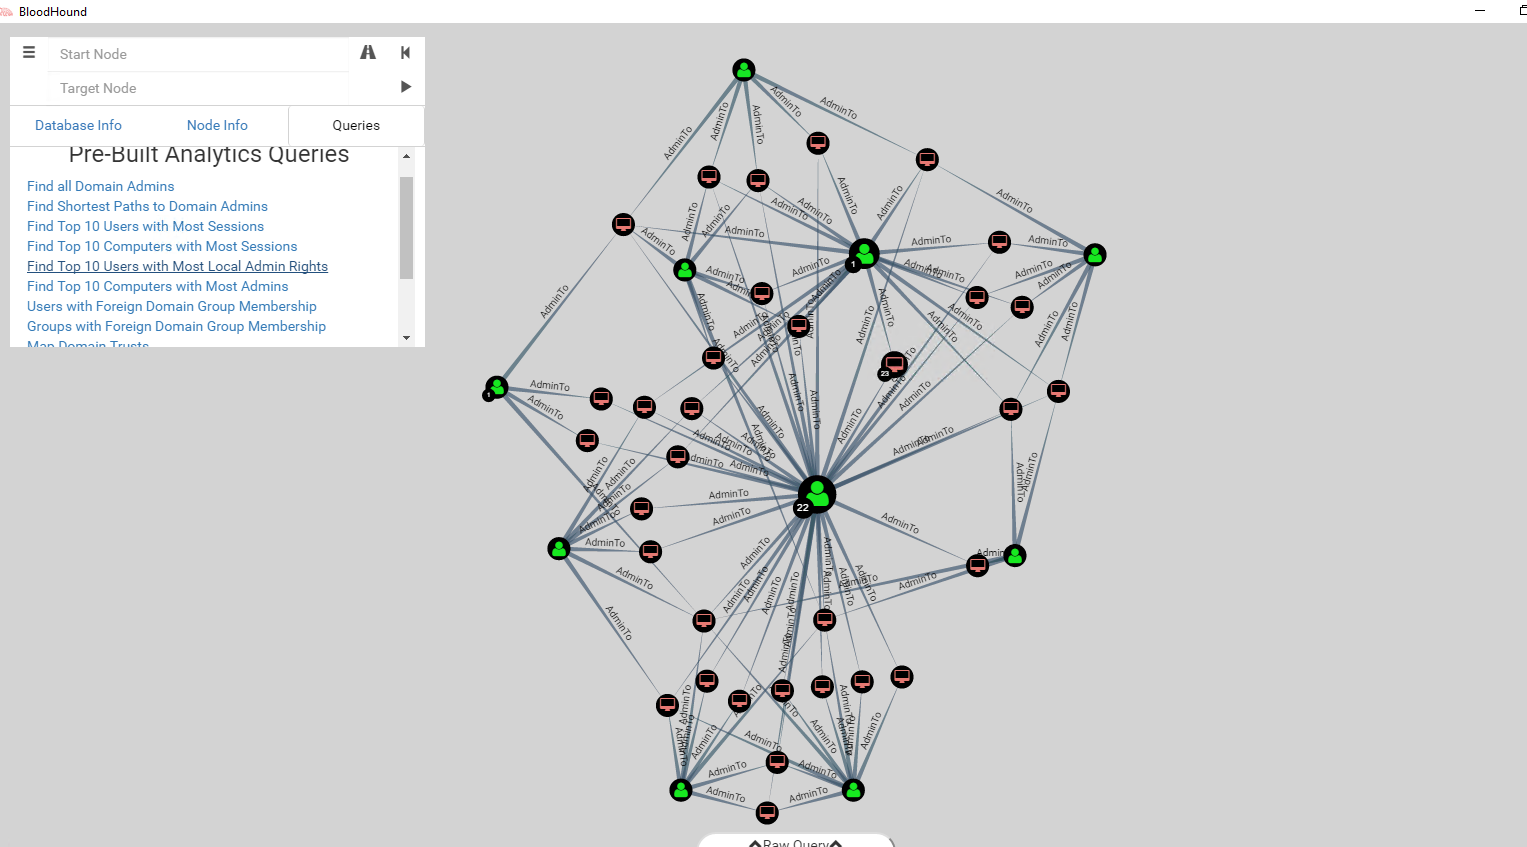
P.S: The images are for representational purposes only

After checking the details in bloodhound, we found that one of the VMWare admin was logged in into RDS53. We quickly jumped into that server only to find out that all updates had been installed on the system and it asked for a prompt to reboot the system to apply the updates. We postponed it for 10 minutes and saw the C:\Users folder that one SCCM admin had recently logged in to the system just 30 minutes ago. We quickly executed the same exploit CVE-2017-0213, ran Procdump and locally dumped the creds. And finally, we had found the VMWare admin as well as the SCCM Admin creds. Looks like the updates didn’t apply till the system was rebooted and the SCCM admin had logged in to run Microsoft Baseline Security Analyzer for the patches which was still running in the backend. We already had the VMWARE Server name with us with the Get-ADComputer PowerShell script that we ran previously. We RDP’d into the System with the VMWare Admin user and found a weblogin for the VMWare Management Server. We fired up the portal and tried to use the same creds we found previously, and we were now, the VMWare Admin and controlled all the virtualized systems within the Data Center.
Updated (to make the statement more clear): We then proceeded to extract the SPN tickets using powershell that we had bypassed previously and also used Impacket for Kerberoasting and then brute forced the tickets to get the credentials. Using this we were able to get access to other systems using the service accounts and then dumped the credentials via procdump and got the creds for the DC-Admin and also the KTBTGT hash. The thing was during the last 2 days I had to move out to a different project and my colleague performed these steps to get the DC. Thus, I have explained only my part of the blogpost.
We almost compromised all of the users connected to the servers, SCCM Admins, Few HR and IT personals, RDS Users and all the VMWare server Users. It was funny that how simple mistakes or missing even a simple patch can lead to this much destruction. Only if the NAC was implemented properly, all of this could’ve been impossible since the other system provided by the client was literally worthless with all the security they had applied.
Recommendations
- The NAC was the main point of compromise here. Without the NAC agent installed, it shouldn’t have even assigned an IP address to my personal laptop. Also, the new user that was created and given to us for the activity had low-level access to a number of Jump Servers. This basically meant that there was an improper AD implemented under which new employees are assigned by default to a group that has access to servers. The users and the server segments should’ve been properly segregated and shouldn’t be allowed to RDP or connect to any servers unless there is an absolute business need for it.
- Another issue was that there was no endpoint protection beyond the anti-virus agent deployed. A UEBA tool or an EDR tool or even simply Sysmon with some open source analytical tool to analyze what’s happening in the backend would have helped pick up the activity possibly.
- And the main part was that there was no wdigest enabled on the servers where we dumped the credentials. If they had, then we would’ve only found the hash of the password and not the cleartext credentials in the dump. Also when we pwned the DC via Kerberoasting, we had to crack the credentials from the tickets we captured. And the passwords used by the employees were something that could be easily cracked using a wordlist. So complex passwords for service accounts is still a very important security control
- Additionally, monitoring for Kerberoasting attacks is now strongly recommended.
Chetan Nayak is a security researcher in Network Intelligence. He has a keen interest in Malware development, hacking networks, RF devices and threat hunting.
6
Why didn’t you dump all computers on the first day ? Enumerate first
Dumping all commputers can be pretty risky. So, first we waited to understand what exactly is going on in the environment. Once we knew how the architecture and the organization was setup, we decided to dump the creds. Our main aim was to try and see if we could find any passwords stored somewhere where, or if we could just try to move without actually using any tool or exploit.
You’ve got your client name and credentials in your Mimikatz dump.
Those are not the client names. Thats been modified
Nice write-up. Did you find/have source for the 2017-2013 exploit on github, or just the binary?
I have added the source of CVE-2017-0213 in the post.
Hey there , did you try for golden or silver tickets before kerberoasting?
No. We didn’t want to use mimikatz or meterpreter on the client machine which is required to extract golden/silver tickets.
and bdw how were the tickets encrypted, using RC4 or AES?
We found them to be RC4
Hi,
Nice Post… Can you explain further what was the output of the kerberos and how you use it in this scenario? I believe this topic should be highlighted in detailed since this is the subject of this post.
Thanks a lot
We extracted SPN tickets and brute forced them and also exploited krbgt password hash. Using this we were able to get access to systems using the service accounts and then dumped the credentials via procdump and got the creds for the DA. The thing was during the last 2 days I had to move out to a different project and my colleague continued the project to get the DC. Thus, I have only written my part of the blogpost.
Hi Chetan,
Thanks for the update. I was expecting like this statement in the blog. Great Post.
Hope you can post more of this.
Updated the post. Thanks 🙂
For BloodHound, all the connections to obtain session and local admin are pretty noisy. Did the SOC flag any alerts during the execution or did you go into it knowing that user/system is going to get burned, so offload the files to another system right away?
Nope. They didn’t. I think that SOC had a lot of things to catch up for. This is the reason we kept kerberoasting and bloodhound for the last step.
Interesting read, thanks!