
Part II: The Technicalities – Linux Kernels and chroots
This is part 2 of building your own mobile pen-testing device. Here’s the link to part 1.
So, now that we know how basic rooting and flashing works, let’s get a bit deeper into the internals of the Android system and see to what extent it is similar to the Linux operating system. The main core of the Android system is the kernel, and this is the only thing in Android which is taken from Linux. If you compare the GUI i.e. the front end or even the programming part of the system, everything differs from Linux at a much larger scale. For example, android OSes, or basically what we call as Android i.e. the Application Framework, are fully written in Java whereas the Kernel is written in C, and partially in C++.
Memory Allocation and Kernel Space
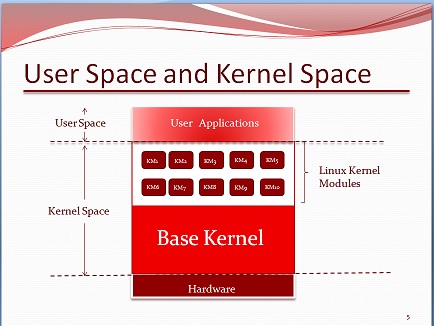
Before we start talking about Kernels, let’s take a look at the memory first. The Memory which is basically the RAM gets divided into two portions; namely the user space and the kernel space. Processes running under user space run independent of the kernel space but not of the kernel. These user space processes have limited access to the memory. The role of the kernel here is to manage the applications and make sure they don’t allocate more than the required memory and also that they do not crash the environment when calling or shutting down other processes and threads. User space is the space where a normal user runs a process whereas in kernel space, the main code of the kernel is stored and only a root user or the system can call the processes here. This is the main reason why a user has limited functionalities. User space processes can only access a small part of the kernel via kernel interface, more preferably known as – the system calls. If a user space process performs a system call, a software interrupt (special instruction with the exceptional condition) is sent to the kernel, and only after receiving an interrupt reply, the kernel will allow the user to execute the process and forward it to the handler.
Most of the android architectures are armhf and x86 bit processors. In x86 bit architectures, there are 4 rings of protection. Theses rings are executed under a specific property of the kernel out of which Ring 0 is known as the ‘Kernel Mode’. The primary Ring 0 holds the highest privilege to the system. Ring 1 is used by hypervisors, containers, and virtual machines. Ring 2 is used by drivers, and Ring 3 is the least privilege mode where the usual processes interact and get executed.
Now, the whole reason for understanding the kernel is so as to know where we stand before rooting. By default, whenever we purchase a new Android device, all the applications we execute, for e.g.: – the Chrome browser, Phone App, messages, games; all of these run under Ring 3. The user processes which are run under Ring 3 are generally untrusted and thus are forbidden to access the Kernel Space. Processes run under Ring 0 are assumed to be trusted, error-free and always run with high priority.
Kernels
Now let’s talk about kernels in general. When Linux kernel was being ported to Android, the changes made to the kernels were minimalistic. The portion which was changed here was only the user space. And this user space is nothing similar to that of any UNIX system. This is the main reason why I stated earlier that other than the kernel, the whole Android OS is different from that of Linux.
When Linux kernel was ported to Android, the kernel needed to suit the ARM architecture and since the usage of android is fairly different from a typical Linux system, few things were actually removed from the kernel to make it quicker in terms of response. Now, if you could remove features from a kernel, you can surely add some. And coming back to our main agenda; if we were to make a pentesting device, we would require support for external drivers and libraries.
And without modifications to the kernel, none of this would be possible. By using a custom kernel, we have the liberty to overclock the processor, add firmware and external network driver support and much more.
To check which kernel revision your Android system has, download a terminal emulator. I prefer to use Jackpal’s terminal emulator since that is a much polished version similar to that of a putty console. To check your android version, type: ‘uname –a’.
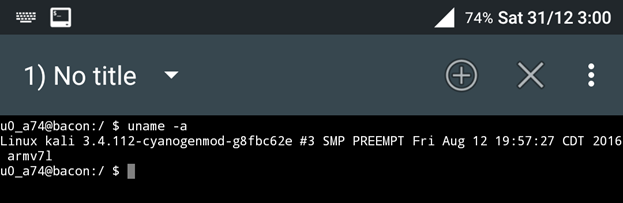
The above image of my android shows the kernel version is 3.4.112 and is a modded version of cyanogen mod and Kali Linux. We will be building a similar custom kernel for our purpose. So, make sure you root and prep your device properly for the same.
Chroot Jail
Now that we know of kernels, let’s talk about installing a full-fledged Linux OS onto our existing Android System. We can surely run lots of apps on an Android System, but all these apps run within their own Dalvik Virtual Machine (now replaced by ART: Android Runtime; since Android 4.4). The Android Runtime is so optimized that every other running app can run their own process separately. The Dalvik VM is register-based, which means it runs classes compiled by a Java compiler, transforms them into a .dex format which further is processed into an odexed file and saved inside of a Dalvik Cache. The ART on the other hand compiles the whole app into machine code which makes it 100 times faster than Dalvik. But however, both ART and Dalvik store them in Dalvik cache to minimize the load on the RAM. Now every time you run an application, it’s cache is called form the Dalvik cache and then gets executed. If an app code gets modified, one would either need to reinstall it or clear the Dalvik cache in order to make the app work, else it will keep running on an endless forced close loop.
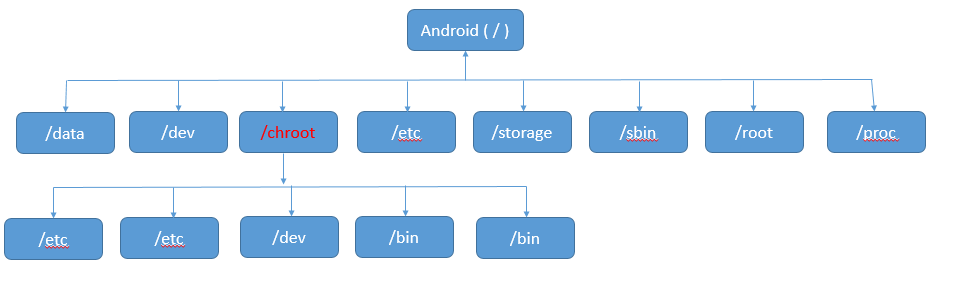
But all of this so called Dalvik VM or ART is too small to contain an Operating System. And this is the place where chroot comes to the rescue. Chroot or more popularly known as Chroot Jail is a technique where we create a directory tree and copy all system files needed to run a system inside specific folders in the tree. Then we create symlinks to all those system files including the root folder of the directory. Thus chroot basically stands for ‘change root’. This chroot jail is pretty secure (unless you are root), since whatever we run in the shell here, it will only be able to reference the directories within the tree, which means it cannot perform actual system wide operations since it cannot connect to the external Android libraries here. Even the root access is only within the chroot’d environment, which means if want to access the sdcard or any system specific directory, we would need to mount it as an external drive in /mnt/ path. And even if mount it, we won’t have access to read and write to those directories until it is specified within the permission of the Android operating system. There is a preferable way than using symlinks, which is to bind mount the directory so that we can call in these files directly via absolute path rather than using a relative path.
Now, let’s say we create a chroot’d environment within Android, we would still need to emulate the commands sent to the system. Even though android shell is powerful, it still cannot emulate all of Linux commands, and this is the sole reason why we need a rooted device. The only application capable of doing this is Busybox (requires root). Busybox is capable of running more than 500 Linux commands along with support for apt-get and other package managers.
Even though all of this may seem tricky and a bit difficult to do, we won’t be doing everything manually. Not all systems support kernel modifications. Chipsets with Snapdragon processor are more capable and faster in handling modified embedded instructions than the MediaTek chipsets. However, in my next few posts, I will be explaining how to install Linux on both the chipsets. One with only chroot’d environment (MediaTek), and the other with Kernel Mods and full-fledged Linux System (Snapdragon).
Chetan Nayak is a security researcher in Network Intelligence. He has a keen interest in Malware development, hacking networks, RF devices and threat hunting.