Overview
I had to do the risk analysis of the Android 2.2 – Froyo based appliance and check for any security flaws exist in it before the XYZ Ltd. (just the example) company could launch that product in the market.
Background
How I get connected to appliance
At start of my task I first assign an IP address (here 192.168.1.88) to the appliance, and ensure I have necessary connectivity to the appliance. The next obvious task is to run a port scan. I use NMAP and to my dismay I find no open ports. I now enabled USB debugging in android appliance by browsing this path of appliance.
Settings > Applications > Development > USB Debugging
Again port scanning the device I found Port No. 5555 Open.
![]()
Then I figured out that by Enabling USB debugging opens Port no. 5555 by default. Odd-numbered range of ports from 5555 to 5585 are usually used by emulators/devices (let Nmap to find’s it out for you).
Intermediate between my machine and appliance: ADB
My next step was to place the bridge between my machine and appliance. Here Google helped me by providing us the Android Debug Bridge (ADB) which is freely available :-).
Android Debug Bridge (adb) is a versatile command line tool that lets you communicate with an emulator instance or connected Android-powered device. It is a client-server program that includes three components:
1] A client, which runs on your development machine. You can invoke a client from a shell by issuing an adb command.
2] A server, which runs as a background process on your development machine. The server manages communication between the client and the adb daemon running on an emulator or device.
3] A daemon, which runs as a background process on each emulator or device instance.
Following is the snippet of ADB.
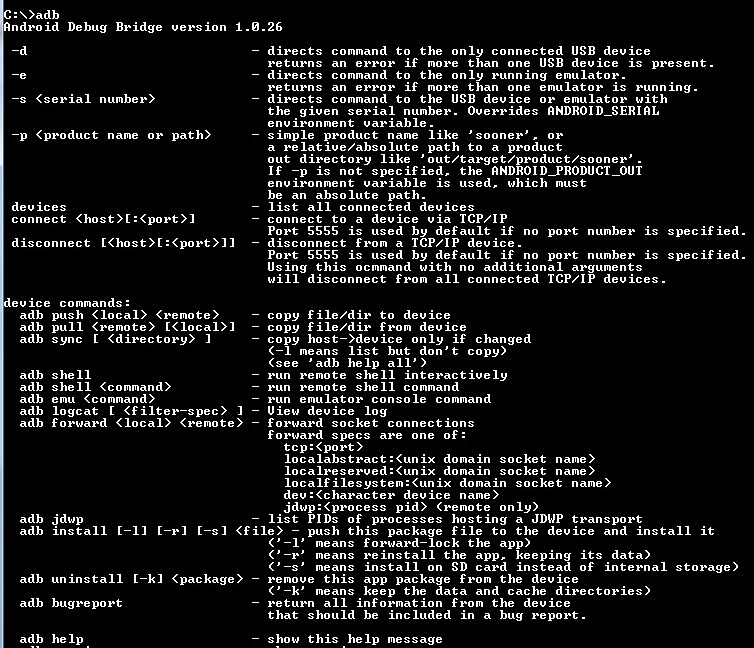
Commands of my interest were as follows:-
1] adb connect device_ip:port_no – connects to attached device
2] adb devices – List all connected devices/emulator
3] adb push <local_path> <remote_path> – Copy file/dir to device/emulator
4] adb pull <remote_path> [<local_path>] – Copy file/dir from device/emulator
5] adb shell – Run remote shell interactively
6] adb logcat – View device log
7] adb install [-l] [-r] [-s] <file> – push this package file to the device
8] adb uninstall [-k] <package> – remove this app package from the device
9] adb help – Always helps to view all switches available 😉
What do you mean rooting the android appliance?
Android is basically a reworked Linux. Rooting means getting super user privilege to android device. Rooting thus provide you with access to system files and the ability to change things that normally are marked read only. This allows you to change all kinds of things that normally you wouldn’t be able to, along with install custom versions of Android.
There are multiple applications available for rooting the android eg: z4root, EasyRoot, SuperOneClick and many more.
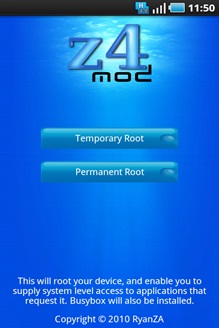
In my case z4root helped me to become root user, it allows for temporary / permanent root using Sebastian Krahmer’s RageAgainstTheCage method.
Tools help
Android Reversing Toolkit (ART) by Deurus which used to Compile, De-Compile, Re-compile the applications.

Manitree (by IntrepidusGroup) is a tool that will review an AndroidManifest.xml file, APK package, or an entire device (or devices) for insecure values in the AndroidManifest.xml file. This is not the exact way to analyze the APK’s but this tool will help you want to analyze 100′s of APK’s in short span of time and pluck out low hanging fruits.
dex2jar is a tool for converting Android’s .dex format to Java’s .class format which is readable by using Java Decompiler GUI utility.
Let’s Get Started
Here our appliance [Target] IP address was 192.168.1.88. Then I connected to the appliance using ADB.

Are we connected? Let’s verified the same
![]()
Uhhh….Finally our appliance is talking to us 🙂 and we are also able to talk. By using the ADB we get the shell access of the appliance by using the command as follows.
Firstly I got the non-rooted (not able to browse all directories and files) appliance and want to pull out all the application (apk). Hence in order to get the path of each application’s installed, I need the packages.xml file. This file helped me to figure the exact path (codePath) of each apk located under /data/app directory (not available usually for non-rooted) of android. Following is the command for the same.
adb pull /data/system/packages.xml

In my case the desired application was in /data/app directory, so i was able to pull APK file from the appliance even if my appliance was non-rooted. But suppose your desired application is located in /data/app-private directory, and then you cannot pull out applications (apk) from non-rooted appliance.
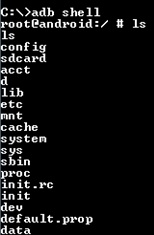
Then i thought of rooting the appliance using the z4Root to get deeper insight of appliance and underlying OS.
And following are the directories and files we could find under root directory. Here our ADB daemon is only running with privilege of root by default.
Under the /system/app we could find all the applications installed in the appliance.
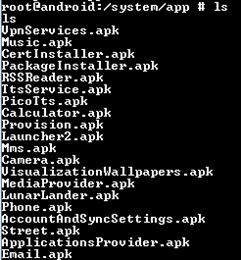
Then we can pull the respective *.apk file via ADB.
![]()
An .apk file extension denotes an Android Package (APK) file. This file format, a variant of the JAR format, is used for distributing and installing bundled components onto the Android operating system.
After pulling the desired apk, I used ART (one method to look into apk) to decompile the apk can be used to Compile, De-Compile & Re-Compile the applications. The steps involved in De-compilation are as follows:-

Now my concern was to dig in this APK file. So just rename the *.apk to *.zip (it is another way to look into apk). Unzip the respective file. Following are the contents of the same.
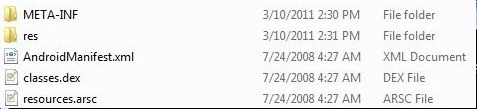
AndroidManifest.xml is a required file for any application. It describes the name, version, access rights, referenced library files, and other information of the application. The AndroidManifest.xml contained in the .apk file has been compressed.
META-INF Directory, where signature data is stored, is used to ensure the integrality of the .apk package and system security.
Classes.dex is a java byte code file generated after the compilation using java source codes.
Res directory is used to store resource files.
resources.arsc is a binary resource file after compilation.
By just supplying the AndroidManifest.xml file to Manitree, it will generate the report mentioning the improper permissions granted to application with severity. Following is the usage for the same.

So let’s check in the code of AndroidManifest.xml which is pointed out by the Manitree.

In above image <grant-uri-permission android:pathPrefix=”/” /> means that anything that is located in a path that starts with “/” is able to access the content-provider of any other application. For better understanding ContentProvider are used to provide data from an application to another (eg: – Social networking app which could access the photos from Gallery, so here Social Networking app & Gallery are sharing the common resource). ContentProvider do not store the data but provide the interface for other applications to access the data. Hence in our case instead of <grant-uri-permission android:pathPrefix=”/” /> it should be <grant-uri-permission android:pathPrefix=”/<specific_application_directory>” />
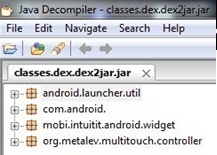
Now let’s concentrate on Classes.dex file. This file can be decompressed using the tool dex2jar.

Now open generated classes.dex.dex2jar.jar file using Java Decompiler GUI [jd-gui].
Expanding each tab we could actually read the code.
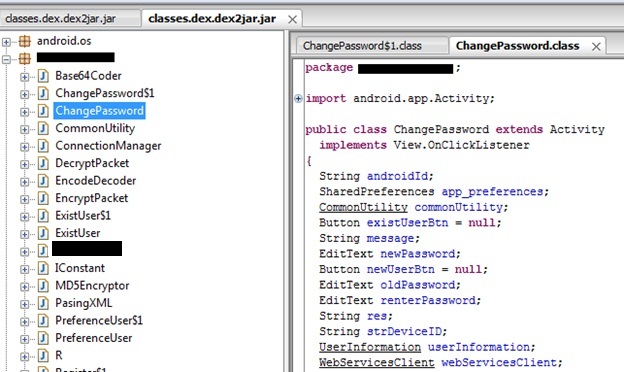
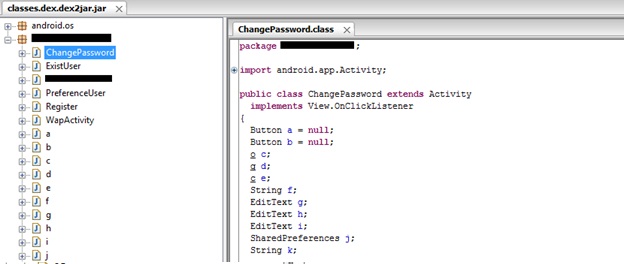
Going through the non-obfuscated code we can understand the flow of code and working of Application. In order to prevent this we can use “ProGuard” tool which shrinks, optimizes and obfuscates your code and renaming classes, fields, and methods with semantically obscure names. The result is a smaller sized .apk file that is more difficult to reverse engineer. After usage of Proguard code looks as follows.
Next step was is there any database in backend for application to store the data. This I could figure out in /data/data/<package_name>/databases/ folder. Then by using the ADB we can pull the desired database file on our machine.
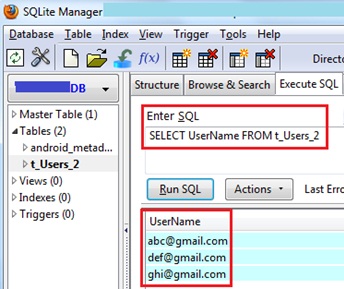
Android as whole uses SQLite database to store the data for each application. We can view the contents of extracted database file of desired “package_name” using the addon in Mozilla Firefox named SQLite Manager 0.7.4 or tool named SQLite Maestro.

Now I can read the un-encrypted database entries and also execute the SQL queries to refine your result.
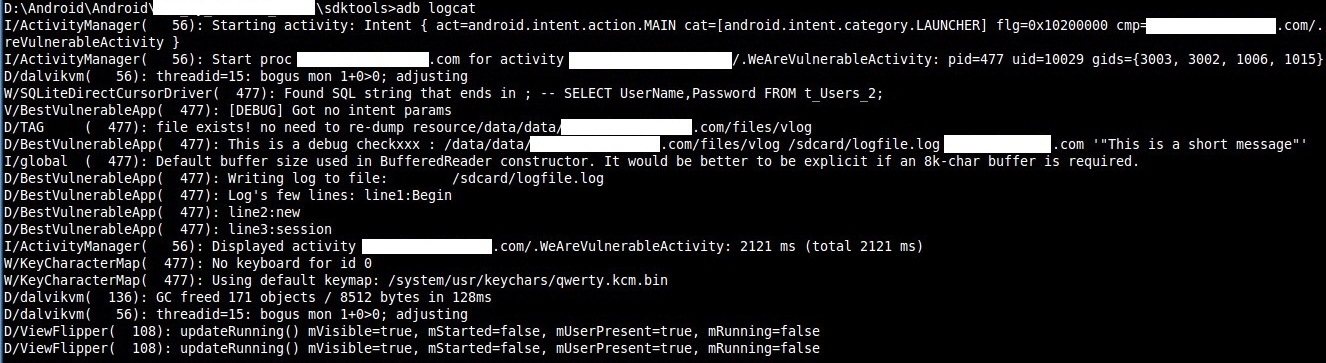
While this entire activity is running always keep “logcat” open in one of the terminal/command-prompt. Logcat has mechanism for collecting and viewing system debug output. Logs from various applications and portions of the system are collected in a series of circular buffers, which then can be viewed and filtered by the logcat command. Following is the command for the same.
adb logcat [<option>] … [<filter-spec>] …
Exercise ended with following Risks
1] Root-level Access to system
2] Installation of 3rd-Party APKs
3] No authentication to access to system
4] Remote Connection/Management of Device
5] Vulnerability in the underlying OS
6] Insecure Coding Practices
7] Unrestricted Browsing permissions
8] Manual Vendor Updates
9] Loss of the Device
10] Database entries are not encrypted
Best Coding Practices for building secure Android application (Source: Google)
1] Maintain a privacy policy
2] Minimize permissions
3] Give your users a choice regarding data collection
4] Don’t collect unnecessary information
5] Don’t send data off the device
6] Use encryption and data minimization
7] Don’t use code you don’t understand
8] Don’t log device or user specific information
9] Use Proguard- Code obfuscation mechanism
10] Performing Input Validation
Pralhad Chaskar is the Security Analyst at NII Consulting. He has over 2 years of experience conducting Penetration Testing, Vulnerability Assessments, Mobile Security and Security Audits.